
Monday, November 9, 2015
Lovely and easy way of making a mini envelope
Follow the step by step guide with these five simple steps:

Sunday, November 8, 2015


Thursday, November 5, 2015


Home Decor (Recycling empty tissue rolls)
An illustrated home decor (step by step) ideal for wall and door decorations.
Things you need:
*** Empty Tissue Rolls
*** Glue
*** Scissors
***Blue Paint

Things you need:
*** Empty Tissue Rolls
*** Glue
*** Scissors
***Blue Paint

Party or Easter Eggs (Mosaic Style)
These mosaic themed eggs will help you spice up your party or Easter celebration.

Things You need:
*** Unpeeled Boiled Eggs
*** Food Coloring
*** Polythene Bags
*** Metal Spoon
*** Drying Rack
*** Water
***Cup cake covers
Method:
Hold each boiled egg and gently tap the the egg with the back of metal spoon so that it will crack. Put the cracked shelled egg on a polythene bag with suitable amount of food coloring. Close the bag and gently move it with your hands until the food coloring has spread evenly around the egg. Take the egg out of the bag and gently wash it with water and leave it to dry on a drying rack. After it has dried peel the shell off the egg and you will notice the mosaic style appearing on the boiled egg. You can serve them in cup cake covers. The illustrated description is given below for more clarity:
DIY Balloon Bowl
Easy and yet elegant bowls can be created from your own hands through this simple DIY steps given below:

Things you need:
*** Balloon
*** Buttons
***Glue
***Stand or cup ( hold the Balloon when your pasting )
***Pin (To burst the Balloon)
Method:
Blow the Balloon to a reasonable size and place it on the stand. Create a pattern or randomly paste the buttons on the balloon with the glue. After it has dried, give another coating of glue on top of the buttons for stability and leave it to dry. After it has completely dried out you can burst the balloon with a pin.
This method can be done with other materials such as confetti, leaves, cords, glitter etc.
For more information and methods on various types can be found here: http://notedlist.com/diy-bowl-ideas-tutorials/
DIY Phone Charger Cable Decoration
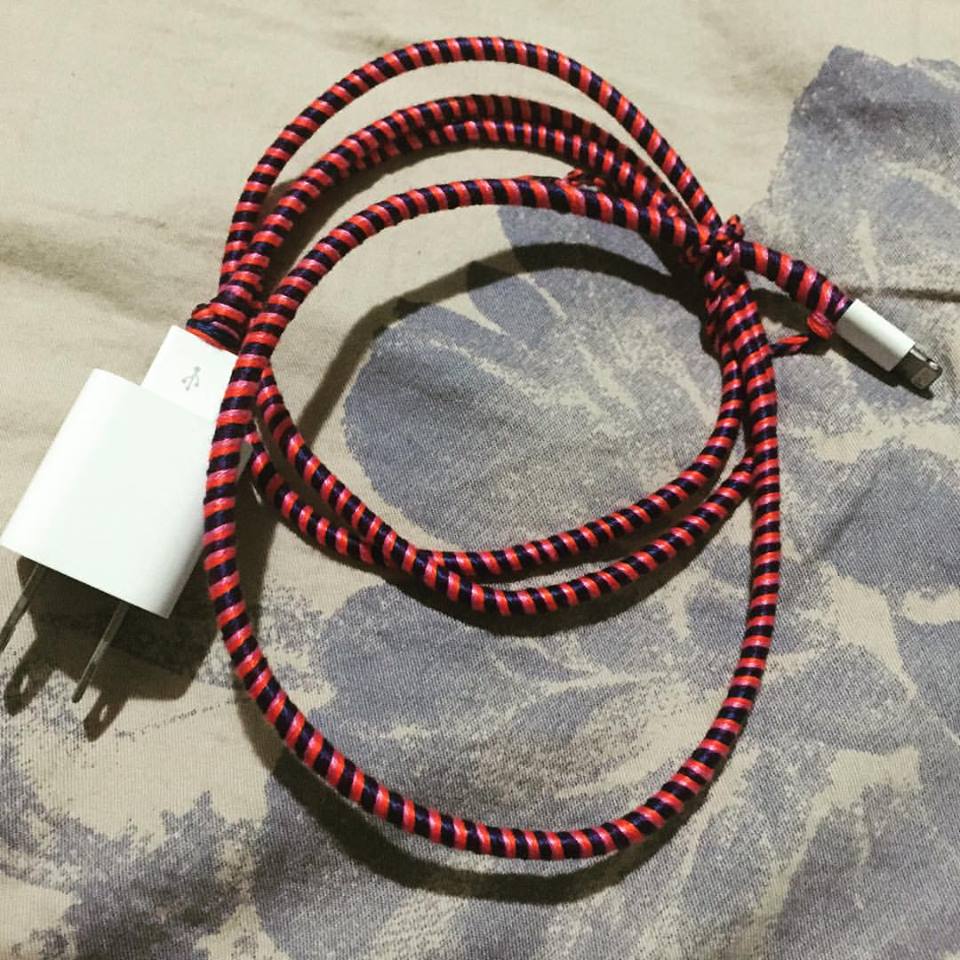
Things you need:
*** Phone Charger (Head phones and other cables can also be used)
*** Yarn or embroidery threads (Four Colors or more) .
*** Scissors
Method: Select four colors of embroidery threads and cut to about four times the length of your charger cable. Tie all threads on one end. Hold down the tied off end and start wrapping. Keep going until you reach the end. If you run out of threads before you’re done, simply tie on another set of four and keep wrapping. Tie a knot at the end and braid the remaining threads. We use the braided part to tie the charger cable together for easy storage.
Recommended tip: For longer usage after your done with decorating the charger cable you can coat it with glue (eg. Chemifix or any other which is thick and white in colour) around the cable so that the threads don't get worn out over time.
You can find other DIY design decors from here: http://www.brit.co/friendship-cords/
Enjoy.
Subscribe to:
Posts (Atom)